


Don't over bake the pumpkin pie!
Pumpkin pies are custard pies and all custard pies are easy to over bake, which will cause cracks to form in the filling. Another unpleasant result of over baking is curdled eggs that create grainy or lumpy textures. This recipe will help guide you in determining when a pumpkin pie is done baking. I find that the bold taste of clove is too overwhelming for the pumpkin and doesn't enhance its flavor, so I don't use it in the pie.
This recipe uses heavy cream instead of evaporated or sweetened condensed milk. The heavy cream creates a lighter pie with more pumpkin flavor. It’s especially desirable if you are making your own pumpkin puree. These are a few favorite pumpkins for pie; Cinderella, Galeux d’Eysines, Jarrahdale, Musquee de Provence and Early Sweet Sugar Pie. I prefer to roast them, which concentrates their flavor over steaming. I used to roast them whole and once cooled remove fibrous strands and seeds. Now I find it easier to cut the pumpkin in half and then remove the fibrous strands and seeds. Place the cut sides down in a roasting pan and bake until they slightly collapse and are tender. Remove from the oven and carefully turn them over to allow the steam to escape. Once cooled, scoop the soft pulp away from the skin. Puree until smooth. Store in a refrigerator in a covered container.
With all pies, having the right pie pan is essential, metal or ceramic are my favorite. Glass pie pans are good but I find they tend to bake unevenly on the bottom. Stainless steel is my least favorite because it absorbs heat so unevenly. The depth and slope of the pan are equally important. If the pan has a steep slope the first slice is almost impossible to remove in one piece. For me the only thing these deep sloping pans are good for are Boston cream pie or tarte tatin. The depth is also important, the perfect pie pan should be heavy and with an opening of 9 inch across the top and a depth of about 1-1/2 inches. The top rim of the pan should be 1/2 inch wide so that it will hold the fluted edge. This will make the total top end to end span closer to 10 inches across. I suggest bringing a tape measure with you when shopping for a pie pan.
Aluminum foil pans are another issue of concern. During the past 10 years some of these pans have become ridiculously shallow, too shallow for almost all recipes. Fortunately standard depth pans are still available and if your local grocery store doesn’t have them, then try a hardware store. The measurements are a little different, 9-3/4 x 1-3/16, but they will hold the amount most recipes yield of a 9 inch pie. They are also labeled as 10 inch pie pans because they are measured from the outer edge of the top rim. If you are using a foil pan then always place it on a cookie sheet to insulate the bottom for the heat and better support. Also the edges of the pans tend to slope down, which will cause your edge to slide off during baking. Before using the pan, bend the edges so they slope up so the crust keeps its shape.
Yields 1 10-inch pie
Pie Dough
1-1/3 cups all-purpose unbleached flour
1/4 teaspoon kosher salt
8 tablespoons (4 oz.) unsalted butter, cold
1/4 cup cold water
In the bowl of a stand mixer with a paddle attachment, add the flour and salt. Cut the cold butter into 1/4-inch thick slices and add to the top to the flour in the mixing bowl. Mix on low speed until the butter has cut into the flour forming a coarse meal. The meal should resemble the coarseness of cornmeal. The meal should also feel cold. Add 1/4 cup of water and continue mixing on low speed until all the ingredients have blended and it starts to form a few balls of dough. It’s important to stop the mixing before the dough forms one large ball, otherwise the dough may be overworked and become tough. Do not add additional water to this recipe, it will make the dough too soft and your fluted edge will not hold.
Turn the dough out onto a lightly floured smooth counter and gently gather into a ball. Dust the ball of dough with flour and gently shape into a round 6 inch pad. Place the dough on a plate and refrigerate for 10 minutes to relax the dough.
Dust the counter lightly with flour. Remove the dough from the refrigerator and place it on the center of the floured counter. Dust the top of the dough with flour. Center the rolling pin in the middle of the dough. Gently roll to the top and then to the bottom without lifting the pin from the dough. Continue rolling to the top and bottom until about a 9 inch long oval is formed. Set the pin aside and lift the dough by sliding your hands held flat under the dough. Slide the dough against the floured table rotating it a quarter of a turn to a horizontal position. Dust the top with flour and center the rolling pin on the top. Roll the pin from the top to bottom as you did before to form a circle. If the dough is longer than the length of the pin, roll half the dough at a time. Check the bottom making sure that the dough doesn't stick to the counter. If it does, dust with more flour. Roll around the outside edge where needed. Round the circle and even the dough to a 12-inch circle. Brush flour from top and then gently fold in half. Brush flour from the bottom of the folded dough. Then do the same to the other half.
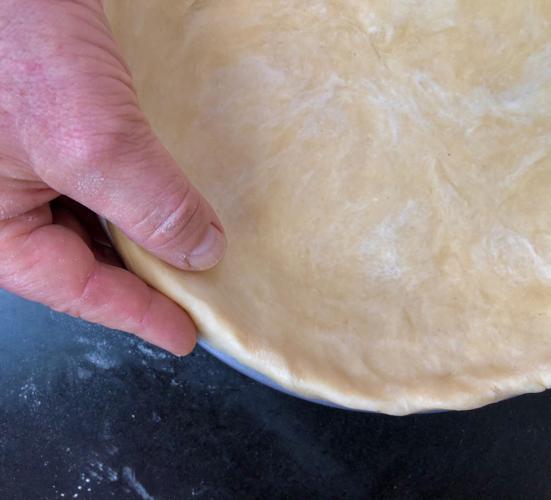
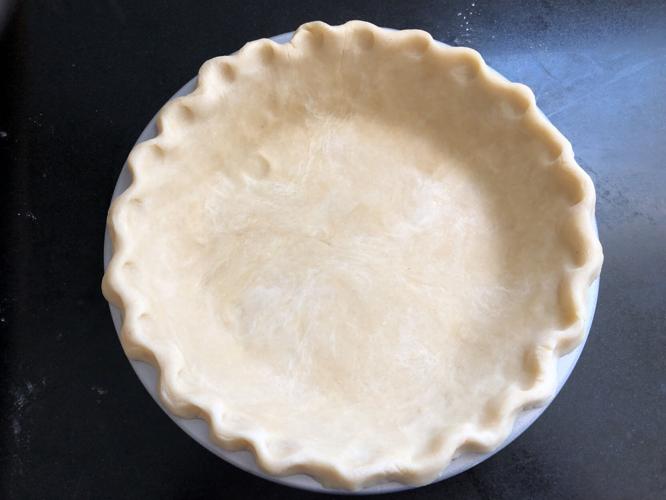
Once the flour has been brushed from the dough. Fold in half and cover half the pie pan, then unfold over the other half. Lift the edges so that the dough falls to the bottom of the pan. Press the dough gently against the pan. Lift, bringing the overlapping edge to the top lip of the pan creating a double layer of standing dough around the top of the pan. Gently squeeze this double layer together so that it stands up on top of the rim of the pie pan.
To flute the edge, space your right thumb and index finger about 1 inch apart. Position this hand inside the shell at the top of the double layered dough. Position your left thumb at the top outside edge of the rim of dough so that it is aligned across and in between your right index finger and thumb. Simultaneously press your positioned hands together forming a curve in the dough. Be careful not to pinch the dough, this doesn't give as good a definition. Move your right hand just above and then move your left hand across from and repeat the pressing. Continue this around the edge of the shell. Refrigerate for at least 20 minutes to chill and relax the dough.
Filling
3/4 cup sugar
1 teaspoon ground cinnamon
1/8 teaspoon fresh grated nutmeg
1/2 teaspoon ground ginger
2 extra large eggs
1 cups heavy cream
1 3/4 cups (1-15oz.can) pumpkin puree
Preheat the oven to 450°F and adjust the oven rack to the lower third level.
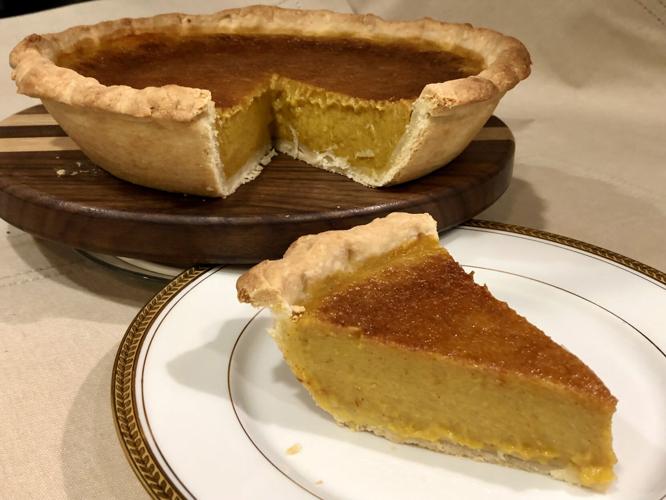
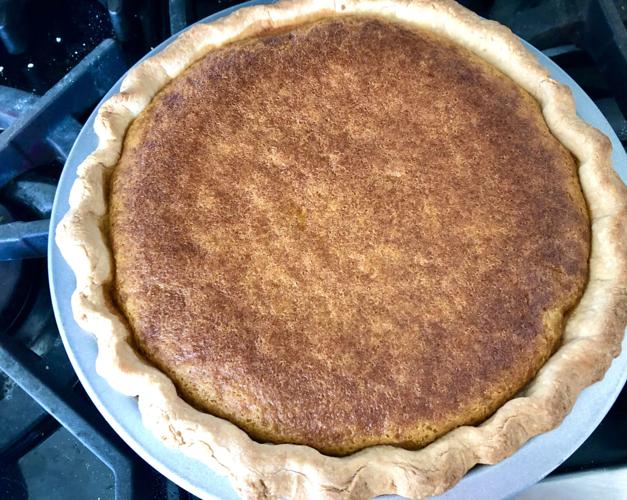
In a large bowl blend the sugars and spices together. Whisk in the eggs until smooth. Then whisk in the pumpkin until incorporated, then add the cream. Pour filling into the center of the shell and place on the center of the adjusted oven rack. Bake for 15 minutes, then reduce heat to 325°F. Continue baking for about 30 minutes or the center has risen slightly and until the custard is set in the center. Lightly touch the center top of the pie with your finger tips, it should feel set like custard and you should not feel or see any fluid when the center is touched. It will wiggle like jello. Remove it from the oven and place on a rack to cool completely. Once cooled, cover and chill until ready to serve. I prefer to make this pie a day in advance which makes the filling more flavorful and slightly firmer.


(0) comments
Welcome to the discussion.
Log In
Keep it Clean. Please avoid obscene, vulgar, lewd, racist or sexually-oriented language.
PLEASE TURN OFF YOUR CAPS LOCK.
Don't Threaten. Threats of harming another person will not be tolerated.
Be Truthful. Don't knowingly lie about anyone or anything.
Be Nice. No racism, sexism or any sort of -ism that is degrading to another person.
Be Proactive. Use the 'Report' link on each comment to let us know of abusive posts.
Share with Us. We'd love to hear eyewitness accounts, the history behind an article.